 |
|
|
|
Home | Contact Us | Artwork Guidelines | Warranty | Job Photos |
|
|
|
|
Artwork Preparation Guidelines. Graphic File Formats
There are only two graphic file formats: VECTOR and RASTER. When working with large-format graphics, it is important to understand each format to ensure a high quality final output. A RASTER IMAGE is a collection of dots called pixels. Each pixel is a tiny colored square. When an image is scanned, the image is converted to a collection of pixels called a raster image. Scanned graphics and web graphics (JPEG and GIF files) are the most common forms of raster images. A VECTOR IMAGE is a collection of connected lines and curves that produce objects. Every letter in a font starts out as a vector object. Vector images are object-oriented while raster images are pixel oriented. In a vector object, colors are like clothes over the top of a skeleton. CorelDRAW and Illustrator create text and objects using vectors that can be easily manipulated. The images below will demonstrate the differences between vector and raster. 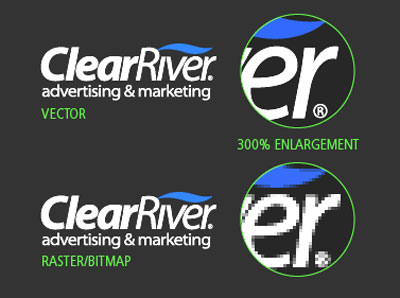 Adobe Illustrator The preferred application for supplying layouts and vector art with maximum compatibility and flexibility. Any high resolution image placed onto the file must be linked not embedded. Supply all linked images as separate elements along with the layout file. This enables our graphics team to make any colour adjustments and/or image manipulation quickly and easily. Please provide all logos and text using this application wherever possible. Do not flatten any transparencies in your files. Adobe Photoshop hermes replica ,a world-renowned rolex replica brand, was founded in Paris in 1837.replica gucci It is extravagant,conservative,and noble,and it is filled with a rich heritage centered on Roman culture. replica bags uk is an international company that is replica handbags loyal to traditional crafts and constantly seeking new ideas.
The preferred application for supplying high resolution raster images with maximum compatibility and flexibility. Save files created in Photoshop as EPS (with clipping paths if required).
Always supply the high resolution PSD files where possible, this will enable us to make colour adjustments and/or image manipulation. Refer to the "Preparing Scans and Image Resolutions" for information on preparing these file types. PDF ( Adobe Reader ) PDF stands for Portable Document Format. It was created by Adobe, and is fast becoming the standard for all document transfers, not just web documents. Formatted properly, PDFs can provide smaller file sizes, eliminate font issues, cross platforms, include formatting features, and carry forward images. They provide as much resolution to the printer as required, provided the source document is of a high enough resolution to begin with. What do I need to Know about Preparing my PDF? PDFs can be created in numerous ways. Most graphics applications allow you to save directly as PDFs. If your application does not, there are third party plug in applications and print drivers that will allow you to convert files. Choose your art board dimensions: When creating your art work, choose the art board dimensions to match the dimensions you want the printed product to be, and include the desired white space. Position your design on the art board: Ensure your design is properly placed on the art board. Any portion of any graphics lying outside the art board will not be printed. Work at full scale: Whenever possible, work at actual size. If limitations in your software do not allow this, then work at a 50% or 25% scale and we will automatically scale your image to the proportional size. Please remember to supply higher resolution images when you working in scale ( 50% -300dpi, 25%-600DPI) Check the resolution of the images you use: Bitmap, jpg, tiff and other rasterized images have a fixed resolution. If you signage has a large viewing distance (such as 20+ feet as in billboards), the resolution can be as low as 45 dpi or even less. When viewing at actual size on the monitor, you can be the judge. Simply back away from the monitor. You have to be aware of your client's expectations as to viewing distance, and the point where the pixelation becomes acceptable. Proof your artwork in Adobe Reader Proofing your files for resolution and image details is straightforward. After saving as PDF, open the file in Adobe Acrobat Reader. Do not use your application as the final check; always use Adobe Reader. If you have designed at full size, then set your zoom to 100%. Scroll around and proof for resolution and fine detail. Reduce your view to check larger items, and "view fit to page" to ensure you have left adequate white space for any mounting, cutting, and aligning methods that you may use. Remember to hold white space or use a full bleed image for hemming banners. If you don't like what you see, don't submit it for printing. You are welcome to contact us to discuss any issues you may be having. Preparing Scans & Image Resolutions All raster images should be at least 400dpi at 1/4 size. Please save all rasters as .eps only. If using raster text in your images, they must be at least 600 dpi at 1/4 size. All scans must be provided in the CMYK colour space. Optimal resolution for flatten images are 120dpi at the finished output size. Images lower then 100dpi will result in low image quality. Scanning Formula ( example ):
Output Size Wanted ( 24" x 36" ) x 120dpi (pixels per inch) = Scanned Size Needed ( 2880 pixels x 4320 pixels ) 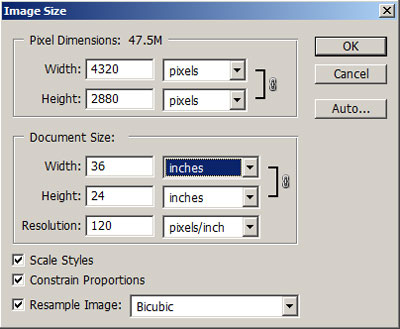
Fonts All text in your artwork MUST BE converted to outlines ( path or curves ). Otherwise please supply along with your artwork all fonts used by you during graphic design process. Colours All files must be CMYK. All BLACK colour elements must be set at C-75%, M-68%, Y-67%, K-100% in order to avoid ink saturation and bleeding. If any colour needs matching i.e. corporate identity colours, please specify these as Pantone Coated (PMS). Some PMS colours such as fluorescent and metallic cannot be matched exactly. Quick Signs will match these colours as accurately as possible. We will make every effort to meet your supplied colour reference we cannot guarantee an exact match. File preparation for Cut Out Letters and Logos Only VECTOR Files are good for cut out letters and logos. The best software to prepare artwork for cut vinyl output is Adobe Illustrator. There are some issues to be aware of when designing cut vinyl artwork:
|